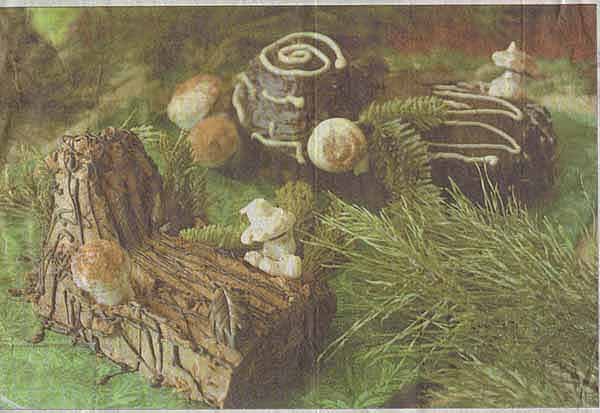
Buche De Noel Yule Log by Onion Creek Kitchens at Juniper Hills Farm in the Austin American Stateman, December 21, 2005
Yule Log Cake (Chocolate Decadence Roll with Meringue Mushrooms) or Buche de Noel
Meringue Mushrooms (prepare first):
4 large egg whites1/4 tsp. cream of tarter
1 cup sugar
(Or you may also use meringue powder; mix as directed; available in stores that sell cake decorating supplied.)
2 tsp. cocoa powder
3 oz. semisweet or bittersweet chocolate, chopped
Preheat oven to 200 degrees. Line a sheet pan with parchment paper and set aside. Combine egg whites and cream of tartar in a mixer bowl and beat at a medium speed until soft peaks form. Increase mixer speed to high and slowly sprinkle in sugar and beat until meringue forms stiff peaks.
Place meringue into a pastry bag fitted with a No. 10 plain round tip (can use a large zipper bag with a corner cut out). Pipe round button shapes for the top of the mushroom. Make some larger ones (2 inches) and some smaller ones (3/4-1 1/2 inches across). Pipe the base of the mushroom into a pointed Hershey's Kiss shape, again some larger and some smaller. Dust with sifted cocoa and bake for about 2 hours or until completely dry.
Melt chocolate in a small glass dish in the microwave using 10 second bursts and stirring well in between.
To assemble mushrooms, match up tops and bottoms as per size. Paint or pipe a layer of chocolate on the underside of a button. Gently press the pointed end of a kiss into the button. Set each mushroom aside and assemble them all. Lightly dust again with cocoa powder.
Note: This made enough mushrooms to decorate the cake two times with 1/2 the batch and make a number of forgotten cookies. Maybe you could 1/2 the size?Yule Log:
10 eggs10 oz. semisweet or bittersweet chocolate, coarsely chopped
1 cup sugar
cocoa for dusting
approximately 1 cup filling - Italian Cream Filling
Preheat oven to 350 degrees. Line a sheet pan with parchment paper and set aside. Separate eggs, placing the yolks in a mixer bowl. Set whites aside. Melt chocolate in a medium sized glass bowl in the microwave, using short 15-20 second bursts, stirring well in between, until smooth and evenly melted (alternatively, melt in a double boiler). Allow chocolate to cool slightly.
Beat the yolks with half the sugar until they are thick and light, about 5 minutes. Slowly add in the cooled, melted chocolate. Scrape yolk chocolate mixture into a large bowl and set aside. Thoroughly wash and dry the mixer and whisk. Beat egg whites with remaining 1/2 cup of sugar until they hold a soft peak.
Fold in a large spoonful of the egg whites into the chocolate mixture to lighten. Gently fold in remaining egg whites into chocolate mixture making sure all egg whites are incorporated throughout. Spread batter evenly into the prepared pan.
Bake 15-18 minutes, turning pan halfway through baking time. Remove cake from oven and allow it to cool thoroughly. Cake will sink in a bit.
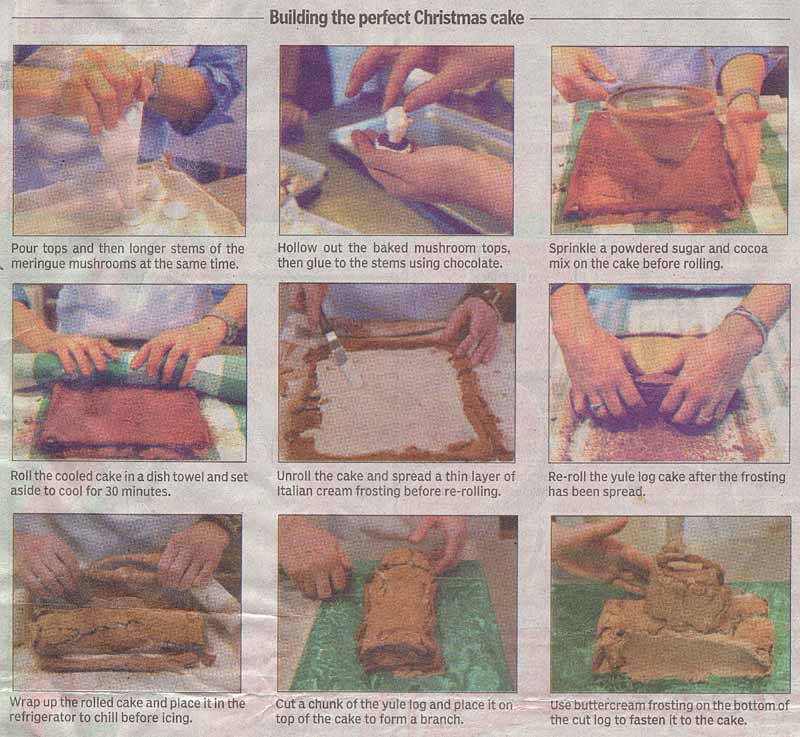
Cover the top of cooled cake with sifted cocoa. Lay a clean towel on top of the cake. Using a sheet pan, cardboard or cutting board-something to aid you in flipping the cake over, cover top of cake and towel and invert turning the cake out. Peel parchment paper from bottom of cake. Cover exposed cake with more sifted cocoa powder. Starting at narrow end, roll up cake and towel together. Let cake sit, seam side down in towel, for about 30 minutes.
Unroll cake; spread with Italian cream filling and carefully re-roll. Place cake on serving plate, seam side down and frost and/or glaze. See assembly directions.
Italian Cream Filling:
8 oz. cream cheese, softened1/2 cup butter, softened
2-3 cups powdered sugar (depending on desired thickness)
1 tsp. vanilla
1 cup nuts - pecans, macadamias, almonds, or hazelnuts, toasted an chopped (optional) 1-2 Tbsp. cream or half and half
Cream butter and sugar until well blended, add powdered sugar and vanilla, mix until creamy and well blended.
Variations:- Chambord: add 1 Tbsp. Chambord liquor and 1 Tbsp. raspberry preserves or jam
- Peanut Butter: add 1 cup peanut butter
- Kahlua, Bailey's Irish Cream, Amaretto, or Grand Marnier: add 1-2 Tbsp. liquor
- Hazelnut: add 1/4 cup toasted, chopped hazelnuts and 1 tsp. Frangelico liqueur
- Coconut: add 1/2 - 1 cup shredded coconut and 1 tsp. coconut extract (coconut can be toasted for a different flavor)
- Lemon or Orange: add zest of one lemon or orange and 1 tsp. extract
- Cappuccino: add 1 tsp. coffee granules dissolved in 1 tsp. hot water
- Mocha: see above for Cappuccino and also add 1/4 cup cocoa powder
Chocolate Ganache:
4 oz. bittersweet or semisweet chocolate, cut into chunks1/3 cup cream
Warm cream in a small saucepan until it barely starts to simmer. Remove from heat, add chocolate chunks and stir until melted and smooth. Set in refrigerator to cool. Bring to a spreadable temperature when ready to use. This can be made in advance.
Chocolate Buttercream Frosting:
1 cup butter1 cup shortening
3 cups confectioners' sugar
1/2 cup cocoa powder
2/3 cup milk
2 tsp. extract - almond, orange, vanilla, or strong coffee
12 oz. mini semisweet chocolate chips, melted or unmelted
In the bowl of an electric mixer, blend butter, shortening and sugar with the paddle attachment until creamy. Add the cocoa, milk, and extract. Continue to mix until well combined. Slowly mix in melted chocolate chips or turn off the mixer and gently fold in chocolate chips with a spatula. Set frosting in the refrigerator to firm up to a spreadable consistency.
Assembling the yule log:
After filling cake and re-rolling, wrap log in plastic wrap and let chill in refrigerator at least 30 minutes to an hour. Cut a slice, about 1 1/2 - 2/1/2 inches thick, off one end of log at a slight angle or straight on. Using buttercream frosting, glue slice to top or side of log to form a stump or branch. Roughly frost log with buttercream frosting to cover. Chill again to set. If using buttercream as your final coat, frost again, covering more thickly, using a spatula to simulate a bark finish. If glazing or ganaching, coat log with ganache and chill to set. Melt a small amount of white chocolate or dark chocolate chips and place in a bag or zip lock to pipe. Using a very small tip, No. 2 or No. 3, or cutting a very small hole in the corner of a zipper bag, pipe bark fines on branch and trunk of log. Decorate with chocolate leaves, meringue mushrooms, fresh Christmas greenery or holly.You can refrigerate cake (without the meringue mushrooms) wrapped loosely with plastic wrap for several days before serving. Allow cake to sit out at room temperature before serving. You also can freeze log at the filled and rolled stage or the roughly frosted stage. You cannot freeze a ganache-covered cake.
 Back to: RecipeBook
 RecipeForm edit
| RecipeClassification | Dessert |
| I | Attachment | Action | Size | Date | Who | Comment |
|---|---|---|---|---|---|---|
| |
BucheDeNoel-1.jpg | manage | 34 K | 24 Feb 2006 - 03:47 | RickMach | Photo of finished cake. |
| |
BucheDeNoel-2.jpg | manage | 90 K | 24 Feb 2006 - 03:47 | RickMach | Step by step photos. |
 Copyright © by the contributing authors. All material on this collaboration platform is the property of the contributing authors.
 Ideas, requests, problems regarding Foswiki? Send feedback


